
My current configuration includes two node cluster with active-passive configuration. I had requested the Storage team to add a new LUN to the Cluster so I can relocate tempDB from its current location to separate disk.
They had added the disk to the server; but when I went to Active Node (Node1)’s Computer Management > Storage > Disk Management and tried to initialize the disk I got the following error:
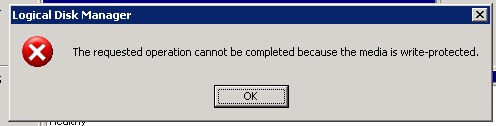
Doing research on the internet lead me to think the LUN was not proper configured for the cluster; I tried Actions > Rescan Disk option also with no success. The new disk showed up with “ ” and Not Initialized message on the Node 1. I checked the passive node it was similar icon in Disk Management; I tried to Initialize the disk on Passive Node (Node 2); I was able to initialize it successfully. I figured when the new LUN was added to the server it would be active on one node only as I couldn’t access it on Node 1.
Adding New Disk as Cluster Resource:
- Launch Cluster Administrator on Active Node.
- Go to SQLServer Group.
- Right click in left pane, select New.
- Select Resource.
- Give it a Name, for example Disk T:
- Select Resource Type, Physical Disk.
- Click Next.
- Select the possible owners for the resource, in my case since it is only two node cluster both nodes get added automatically.
- Click Next.
- Select dependencies; that is which resources should be online before Disk T is brought online. This option for disk is not required unless you are using Mount Points; then you would want to make sure Mount Point Disk is listed as a dependencies.
- After adding dependencies, click Next.
- From the Drop Down select the new Physical Disk.
- Click Finish.
Adding New Disk as Dependencies to SQL Server:
- Launch Cluster Administrator on Active Node.
- Go to SQLServer Group.
- Right Click on SQL Server, select Take Offline.
- Right Click on SQL Server, select Properties.
- Select “Dependencies” from Tabs at top.
- Click Modify.
- Select the New Disk Resource that was just added.
- Click OK on both windows to get back to Cluster Admin console.
- Right Click on SQL Server, select Bring Online.
Just FYI, if you don’t set the dependencies information you will not be able to use that disk in SQL Server; when trying to relocate TempDB you will get the following error from SQL Server:
Cannot use file ‘T:\MSSQL.1\MSSQL\Data\tempdb.mdf’ for clustered server. Only formatted files on which the cluster resource of the server has a dependency can be used. Either the disk resource containing the file is not present in the cluster group or the cluster resource of the Sql Server does not have a dependency on it.
Msg 5184, Level 16, State 1, Line 1
Cannot use file ‘T:\MSSQL.1\MSSQL\Data\templog.ldf’ for clustered server. Only formatted files on which the cluster resource of the server has a dependency can be used. Either the disk resource containing the file is not present in the cluster group or the cluster resource of the Sql Server does not have a dependency on it.
After all this was done I tried failing resources back to Node 1 with no luck, it still gave me similar error on disk. Talking to Storage guys they assumed it was an Windows issue, but after digging into the configuration settings on DMX it seems you can have different settings for read/write properties for same LUN on two different nodes. After fixing the setting to read/write on both nodes; drive started working successfully.

This saved my bacon today. Thanks!
Hmmm baconnnnn… no wait I am vegetarian. 😛 Well I am glad it helped you sir! I appreciate the feedback :D.
Nice guide! Keep it on.